
Spring in the house - AECP post
I just came back from a trip to a warm and sunny Europe visiting family and friends and by the time I got home last week I was hoping spring would be well on its way in northern Virginia too.
Well, it's not.
For some time now I have had a plan for a special project with the lovely Nature Snippets set from Altenew and the time has come for me to bring spring into the house! Some inspiration came from an Altenew Academy class, "With a Twist" by the excellent Therese Calvird from Lost in Paper
Her class reminded me to look at my stamps with a different perspective - what else can I make with these?
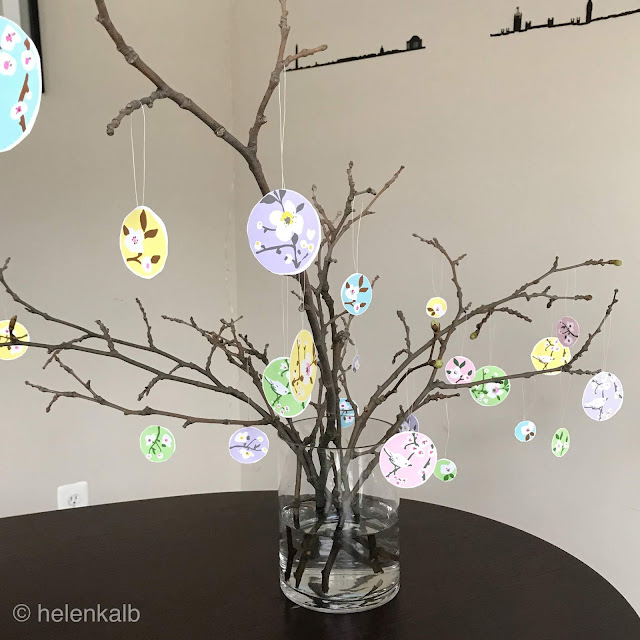
At this time of year in Sweden, people bring in branches into the house and decorate with feathers and I wanted to make something similar to that but using stamped images instead. Here is a picture from Pinterest showing Easter feathers.
Please note that my branches were blown down from the trees in the park area next to my apartment - I did not break living branches off the trees! When you collect branches like this you never know whether they will open leaf buds or not but some of mine are :) as you can see in the pic below.

I started by stamping 5 of the Nature Snippet images in several spring colors, each one was stamped twice in each color so that I would have enough for both sides of my hanging paper ornaments.

Here are the Altenw Crisp Ink color combos I used, clockwise from top left:
Purple - Wisteria, Cloudy Night and Citrus Burst.
Green - Firefly, Shadow Creek, Pinkalicious.
Pink - Pink Diamond, Mountain Pine, Rubellite.
Blue - Sea Breeze, Milk Chocolate, Rubellite.
Yellow - Citrus Burst, Espresso and Pinkalicious.
I used my MISTI stamp positionner to stamp these out as I did need to re-stamp these solid images a couple of times to get good coverage.
A note; when you first stamp with Altenew inks (like most dye inks) your images will be dark and rather splotchy, see below. On the left an image that has had time to settle into the paper and dry and on the right an image that was just stamped. The difference is quite marked so please be patient and let the ink do its magic!

For the last layer, the flower centers, I used an acrylic block, it was just quicker than the MISTI.
Then it was time to cut everything out with scissors. These images are easy and freehand style so the cutting was not complicated, but it still took me a good half hour to cut all 40 images out.
As they are not absolutely symmetrical I did leave a tiny white border - that way if the backside is peaking out when they are glued together it doesn't really matter. I also think the uneven edges adds to the charming, handmade feel.

To fasten my thread (a bead weaving thread I had in my stash) I used Micropore tape which is the thinnest one I have and then I used liquid glue to attach the pieces together. After leaving them under a heavy acrylic block for a few minutes they were good to go and I could decorate my tree.


Will you try and make your own Easter tree? Please let me know your thoughts in the comment section below.


Wow, how awesome, Helen! I am wowed by your creative ideas! This is so "Hygge"!! I love love it! The tree branches are awesome for the rustic feel and your choice of stamps is spot on! I am so glad that you enter your beautiful work in Altenew AECP assignment Gallery. Awesome details and design! Super work!
ReplyDeleteWhat a delightful spring tree decoration!!!
ReplyDeleteOh thanks so much Natasha!
DeleteI am so impressed with you Scandinavian knowledge Virginia, I think this can be called hygge perhap, yes. Thanks for your lovely comments on my work, I so appreciate them!
ReplyDeleteBravo��������
ReplyDeleteThis is really Påskpynt To me. Brings back memories from Sweden and my childhood. Excellent idea in choise of shape as well. Your twist in doing things your way.
ReplyDeleteThanks Ingela, I’m glad you like this!
ReplyDeleteThis is SO amazing! I am glad you chose to go with something other than a card! So awesome.
ReplyDeleteThanks so much for entering your beautiful work in the AECP assignment Gallery. I love your write-up and descriptions! Please keep up with your excellent work!
Thank you Erum! It was a lot of fun to make and brings some spring into the house too.
ReplyDeleteWhile I don't make Easter trees, it's always fun to decorate for any season! Nice job, and great explanation of the ink because I have had this issue!
ReplyDeleteThanks for your kind comments. It’s fun to find new uses for stamps!
DeleteWow, this is amazing, Helen! I LOVE it! So creative!
ReplyDeleteThank you so much Alex, I am a great fan of yours and am so happy for your kind comment!
DeleteLove the tree with so many colors
ReplyDelete