
The AECP workshop
Over the past one and a half years I have been working on my Altenew Educator Certification Program, I have taken my time one could say since I know several other people who have gone through the program quicker than that. I am glad that the AECP allowed me to pace my progress, combining my hobby with my full time job!
Having completed 25 Altenew Academy Classes and 2 challenges set by AECP coordinators Virginia Lu and Erum Tasneem I was as ready as I could be for the final challenge - to plan, prepare and conduct a two hour cardmaking workshop.

We made three cards in the workshop using two Altenew stampset; Ditsy Prints and Celebrate in different ways. The first one was the hello card above, designed to teach how to
- stamp using photo polymer stamps and an acrylic block
- stamp a background
- stamp layering using several ink colors.

The second card introduced the participants to heat embossing which is such a fun thing when you see it for the first time!

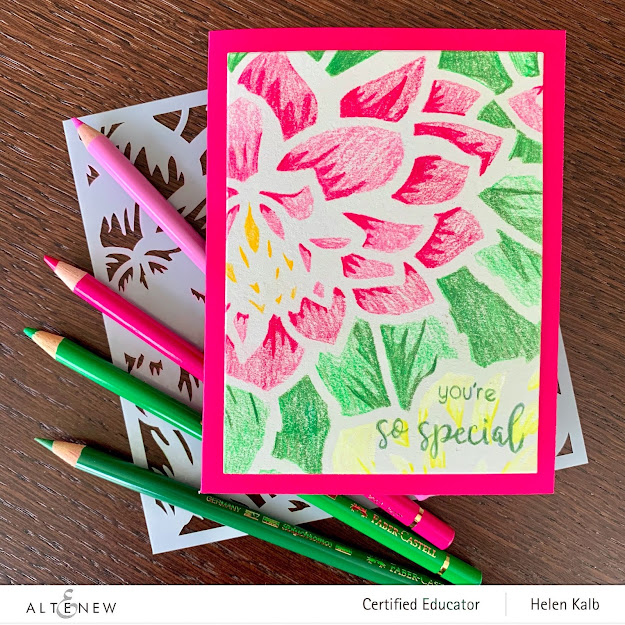
The final card used a negative heart mask as a focal point and using one of the layering stamps to create a different flower pattern.
As I ended up having 8 participants in my workshop I did not have enough room to conduct the workshop from my home so I reached out to my former employer who allowed me to use their beautiful office in Arlington, VA. I have worked for Mercuri Urval in the US and in France for many years and the company is almost family to me so it felt very fitting to be back at their office!

The room is setup for stamping!

Each participant received all the materials and detailed instructions to create the three cards during the workshop.


My participants were mostly beginners to stamping but certainly crafters so even though this class was an ambitious plan I felt that it was doable. They all did an awesome job!


 |
| Some of the cards made by the participants in my workshop |
Having completed 25 Altenew Academy Classes and 2 challenges set by AECP coordinators Virginia Lu and Erum Tasneem I was as ready as I could be for the final challenge - to plan, prepare and conduct a two hour cardmaking workshop.

We made three cards in the workshop using two Altenew stampset; Ditsy Prints and Celebrate in different ways. The first one was the hello card above, designed to teach how to
- stamp using photo polymer stamps and an acrylic block
- stamp a background
- stamp layering using several ink colors.
Supplies for Hello card
· Ditsy Print stamp set
from Altenew
· Dye inks; black, green
and three blue inks – choose a light, a medium and a dark
· Card base 5 ½ x 4 ¼
inches
· Card blank 5 ¼ x 4 inches
· Die cut hello sentiment
Stamping
· Pick up the flower
cluster outline image with your acrylic block
· Stamp the image in black
towards the middle of your card blank
· Turn the stamp and stamp
the image several times around the center image to create a pattern
· Do not overlap the
images, leave some white space!
· Stamp over the edges so
it looks like this is a piece cut from a larger patterned paper
Coloring
with the layering stamps – first layer
· Use the most solid flower
layer
· Lay it on top of the stamped
image to find the position
· Pick it up with your
acrylic block
· Use the lightest blue to
stamp/color the flower cluster
Second
layer
· Use the second most solid
layer
· Line up and pick up stamp
as above
· Use the medium color to
stamp all the flower clusters
Third
layer
· Use the third or least
solid (shadow) layer
· Line up as above
· Use the darkest color to
stamp all the flower clusters
Stamping
the leaves
· Stamp one or two of the
leaf stamps in green ink using the same line up technique to find the correct
position
Glue
the card blank on to your card base, press down for a few seconds or leave
under a book.
Glue
the hello word at an angle, press down and leave to dry.

Supplies for kraft heat embossed card
· Ditsy Print stamp set
from Altenew
· Embossing ink
· Card base 5 ½ x 4 ¼
inches - white
· Card blank 5 ¼ x 4 inches
- kraft
· White detail embossing
powder
· White pencil
Stamping
– the sentiment
· Line up sentiment along
the lines on your acrylic block
· Pick up sentiment with
second block, also along one of the lines
· Treat paper with
embossing buddy or corn flower applied with a brush
· Ink up sentiment with
embossing ink
· Carefully stamp down using
grid lines to make sure sentiment is straight
· Cover with embossing
powder
· Pour off excess embossing
powder onto a sheet of paper and funnel back into jar
· Melt the embossing powder
using a heat gun
Stamping
– the flower cluster
· Pick up the flower
cluster outline image with your acrylic block
· Ink up the image with
embossing ink
· Carefully stamp down
above the sentiment
· Cover with embossing
powder
· Pour off embossing powder
onto a sheet of paper and funnel back into jar
· Melt the embossing powder
with a heat gun
Coloring
with Polychromos pencils
· Color the image lightly
with a white or other pale colored pencils
Glue
the card blank on to your card base, press down for a few seconds or leave
under something heavy.

Supplies for masked card
· Ditsy Print and Celebrate
stamp sets from Altenew
· Four gradually darker ink
colors – any color family from Altenew
· Card base 5 ½ x 4 ¼
inches - white
· Black sentiment strip cut
from black card stock ¼ inch
· Embossing ink
· White detail embossing
powder
Masking
the heart
· Cut a heart shape out of
contact paper
· Apply the negative mask
onto card base so heart is centered slightly towards the top of the card
Stamping
– the flower cluster
· Pick up the second flower
cluster layering image with your acrylic block
· Ink up the image with the
lightest color ink
· Stamp down in the top
left corner of the heart
· Carefully wipe off extra
ink from the contact paper with a paper towel
· Ink up with next darker shade
and turning the stamp the other way, stamp as closely as possible without
overlapping
· Continue stamping in
gradually darker colors until the heart is filled
· Remove the mask (keep it
for another card)
Stamping
– the sentiment
· Line up sentiment along
the lines on your acrylic block
· Pick up sentiment with
second block, also along one of the lines
· Treat black sentiment
strip with embossing buddy or corn flower applied with a brush
· Ink up sentiment with
embossing ink
· Carefully stamp down to
make sure sentiment is straight
· Cover with embossing
powder
· Pour off embossing powder
onto a sheet of folded paper and funnel back into jar
· Heat the embossing
· Trim the sentiment strip
to the correct size
· Glue down sentiment strip
on to the heart
 |
| Showing off some of the beautiful cards made during the workshop |

The room is setup for stamping!

Each participant received all the materials and detailed instructions to create the three cards during the workshop.


I also brought along a selection of Altenew stamp sets and cards to show some of the many possibilities of what you can make with inks, stamps and paper.


Workshop in full swing - everyone hard at work creating.


Here are some of my lovely participants showing off their favorite cards at the end of the workshop - I love all their cards!


I should like to particularly thank Virginia Lu who observed and participated in the workshop over video, and who has been instrumental to my journey with the AECP program. It was a pleasure meeting you virtually Virginia and I think you'll have some new followers at your blog and Instagram!
I was also happy to meet Altenew Operations Director Nicole Picadura as she was able to take time out of her busy schedule to come in and say hello.
A special thank you to my husband Jean-Michel who kept the Google Hangout open and filmed the duration of the workshop as well as taking stills for this blogpost. As usual I could not have done it without you...
Thank you to my former boss and good friend Chris and his son Drake for spoiling us all with pizza and salads after the workshop - everyone was ravenous so this was a perfect end to the evening!
And most of all, thank you my lovely and studious participants; Meghan, Linda, Dawn, Sarah, Gretchen, Lauren and my dear friends Darcey and Sterling!

Drake drew a lovely picture of the room, I thought he drew the cards on the credenza but it's in fact the pizza boxes - food is more important than cards to a seven year old!
Big hugs,
Helen


What a GLORIOUS post, Helen! It was a DELIGHT to be part of your workshop despite the early technical glitches. However, with your awesome hubby's help, we even managed to have two camera throughout the workshop and I had the best bird's eye view in the class! I love your choice of materials and showcase of techniques. It's been an amazing experience to watch you grow, learn and progress in the last one and half year. You truly are natural stamping teacher and we would love to see you represent Altenew wherever you go. Congratulations to you! Bravo! Big thanks to your hubby and participants as they are troopers! Thank you for taking the time and effort in this journey!
ReplyDeleteThank you for everything Virginia, this has been a great journey and I feel ready for anything at this point! I loved teaching this class and hope to do many more from now on :)
DeleteLOVED the post, the details and the description is so on point that I didn't feel I missed the workshop. Thank you for sharing your massive talent and your superb personality with us Helen!
ReplyDeleteWe missed you Erum but thanks for the lovely note!
Delete