
Die cutting with a difference
I didn't start die cutting until 3 years ago, that is not a long time for someone who has been making cards for almost 25 years!
It seemed a die cutting machine was a big investment and the dies were expensive and I wasn't really that impressed with the dies that were available.
That all changed though as companies like Altenew started selling word dies that went with their stamp sets - the Halftone Hello and the Halftone Happy are firm favorites, I have made SO many cards using these, see a couple by clicking these links: Golf, tennis anyone? or Handstamped Backgrounds or again here: For the Guys.
So I had to get a die cutting machine and now I am so happy I did, I love coordinating dies and infinity dies and I would love to try out cover plates but they are pricey so I have not gone in that direction, yet...
Today I am using coordinating dies to try and create the look of a cover plate to stretch my supplies and come up with new looks.

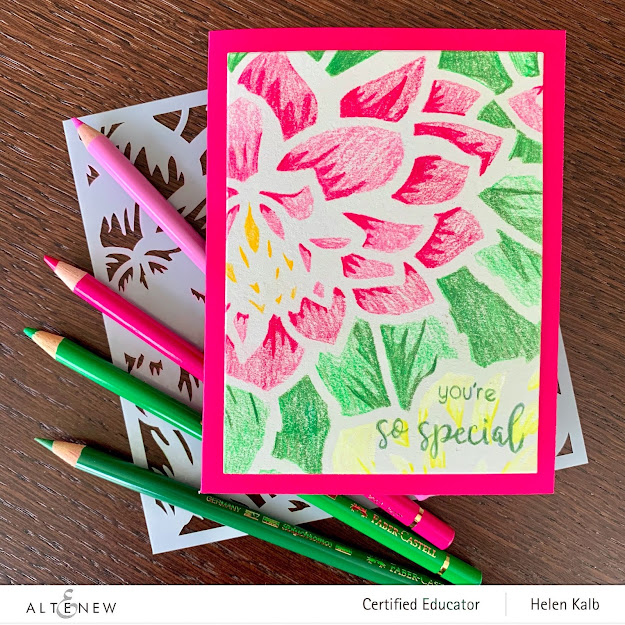
These first two cards were created with flower dies that I arranged to make a strip of cuts onto heavy 110 lb white card stock.

To keep the dies in place I taped them together with blue painters tape which ended in catastrophe when I sent my cutting sandwich through my machine... The tape was far too tacky and my card stock was torn in several places - zut alors! (as we say in French)


So I positioned my homemade strip of die cuts both horizontally and vertically on my card stock to get two different cards. I quickly realized that my die cuts were a bit too spaced out to look like a cover plate but I still liked the effect, the question was how can I still use these and make them into cards?

After adding a sheet of blue card stock on the back of the card I decided to add some stamping in coordinating blue inks to fill the pattern out.

I also added a couple of sentiments to finish the card up.

The green version of the card was finished the same way.
I now had a number of white die cuts that I initially had no plan for, but I quickly decided to make an all white card with these.

So I glued down all the lose pieces and I even had to cut a few extras to cover the card completely. But remember my ruined card stock above - I used that to cut out the needed pieces. Nothing is wasted!

I decided to add a very blue sentiment to this white card and I love the result.

These cards were inspired by a class taught by the amazing Lydia Evans at Altenew Academy, the class is called Dynamic Die-Cutting and I absolutely loved it and learned many tricks - had I had the right supplies I would have used Lydia's trick for assembling dies on acetate!

Hope you are having a great weekend, see you soon!
Hugs,
Helen
It seemed a die cutting machine was a big investment and the dies were expensive and I wasn't really that impressed with the dies that were available.
That all changed though as companies like Altenew started selling word dies that went with their stamp sets - the Halftone Hello and the Halftone Happy are firm favorites, I have made SO many cards using these, see a couple by clicking these links: Golf, tennis anyone? or Handstamped Backgrounds or again here: For the Guys.
So I had to get a die cutting machine and now I am so happy I did, I love coordinating dies and infinity dies and I would love to try out cover plates but they are pricey so I have not gone in that direction, yet...
Today I am using coordinating dies to try and create the look of a cover plate to stretch my supplies and come up with new looks.

These first two cards were created with flower dies that I arranged to make a strip of cuts onto heavy 110 lb white card stock.

To keep the dies in place I taped them together with blue painters tape which ended in catastrophe when I sent my cutting sandwich through my machine... The tape was far too tacky and my card stock was torn in several places - zut alors! (as we say in French)

``
So I looked for solution and decided to generously add antistatic powder from my embossing buddy bag, this did work fine.

So I positioned my homemade strip of die cuts both horizontally and vertically on my card stock to get two different cards. I quickly realized that my die cuts were a bit too spaced out to look like a cover plate but I still liked the effect, the question was how can I still use these and make them into cards?

After adding a sheet of blue card stock on the back of the card I decided to add some stamping in coordinating blue inks to fill the pattern out.

I also added a couple of sentiments to finish the card up.

The green version of the card was finished the same way.
I now had a number of white die cuts that I initially had no plan for, but I quickly decided to make an all white card with these.

So I glued down all the lose pieces and I even had to cut a few extras to cover the card completely. But remember my ruined card stock above - I used that to cut out the needed pieces. Nothing is wasted!

I decided to add a very blue sentiment to this white card and I love the result.


Hope you are having a great weekend, see you soon!
Hugs,
Helen


Truly fabulous, Helen! You really soak up all the lessons and created so nicely! Thanks so much for entering your beautiful work in Altenew AECP assignment Gallery. Beautiful colors and design. Well done!
ReplyDeleteThanks Virginia, the class was truly inspiring and I always try not to copy but create my own.
DeleteWOWZERS!! Look at your rocking those dies!! Very very well done, Helen! Fabulous work!
ReplyDeleteThank you for entering your beautiful work in the AECP gallery.
Thanks Erum!
Delete